Login and Security Features
To better protect your information, FastSpring has incorporated multiple safeguards within the App, securing accounts and associated personal or business data. Company Administrators can set up Two-Factor Authentication or SSO for users with access to login.fastspring.com/identity/auth/login.
Login Experience
When logging in to the FastSpring App, you have the option to log in using your Password, or Google Single Sign-On (if applicable). If you have access to multiple companies, select the applicable Company ID. This allows you to switch between your companies without logging out.
If a user inputs incorrect information 6 times, they will be locked out of the App until a FastSpring Admin unlocks it. See Account Lockout below.
Two-Factor Authentication
FastSpring’s Two-Factor Authentication requires users to go through an extra authentication step when signing in to the App. This is not applicable for users who use Social or SSO to sign on.
Enable or Disable Two-Factor Authentication
- Sign in to your FastSpring account:
- Using Springboard (Classic): Click Account in the top right navigation bar, then select Security Settings.
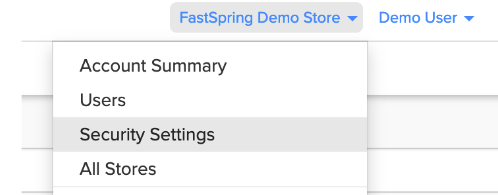
- Using the FastSpring App: Click the dropdown at the top right (next to your Company ID), then select Security Settings.
- In the 2-Step Verification field, select Required. This ensures that all users on your account must sign in using two-factor authentication (2FA).
- Click Save to save your changes.
Set up your authenticator app
Once 2FA is enabled, users will see a QR code the next time they log in. To complete the setup:
- Open an authenticator app (e.g., Google Authenticator, Authy, Microsoft Authenticator).
- Scan the QR code displayed in the app.
- The app will begin generating 6-digit time-based codes (TOTP).
- Enter the code to complete the verification setup.
Log in with 2FA enabled
When logging in after setup:
- Enter your email and password as usual.
- You’ll be prompted to enter a 6-digit code.
- Open your authenticator app, find the code for your FastSpring account, and enter it to complete the login process.
2FA FAQs
Do I need a smartphone to enable 2FA?
No. You just need a device that can run an authenticator app. This could be a smartphone, tablet, or desktop app that supports TOTP (e.g., Google Authenticator, Authy).
Can I use multiple devices for 2FA?
Yes. Some authenticator apps allow syncing across multiple devices if configured that way. This can give you access to your 2FA codes from more than one device.
Single Sign-On (SSO)
If you or other users in your organization use a Google account to sign in to the App, you can enable Single Sign-On. After it is enabled, users have the option to click Sign In with Google at the login page. This prompts them to select the Google account they would like to log in with. Only Google authentication is supported at this time.
Enable or Disable SSO
- In the FastSpring App, sign in to the applicable store.
- At the top, right corner, click the drop-down with your Company ID. Select Security Settings.
- In the Single Sign-On field, select from the following options:
- Optional: Users will be have the option to sign on using their Google credentials
- Disabled: Users will not be able to sign on using their Google credentials even if they have a Google account.
- To require all users to sign on using their Google credentials, contact our Support Team.
- Click Save to save your changes.
IP allowlist
For added security, consider configuring an IP allowlist located at the bottom of the Security Settings page. This feature restricts access to your account based on specified IP addresses, enhancing your account's protection against unauthorized access attempts.
Important! When configuring an IP Allowlist, ensure that the IP addresses are entered correctly. If the IPs are misconfigured, you will not be able to access your account and will need to contact support for assistance.
Account Lockout
To protect your information from malicious attacks, the dashboard applies account and username protection. If a user enters the correct username, but an incorrect password 3 times, they will be addressed with warnings. After the 6th attempt, the dashboard will lock out the account affiliated with that username.
If this happens to a user, they can reset their password to unlock the account. FS Admin can also unlock (or lock) an account after verifying relevant identity information.
Reset Your Password to Access the App
- Navigate to the Login page. Above the Password field, click Forgot your Password?
- Enter the email address associated with your account. Click Send Email. A password reset email will be sent to your email address if there is an account associated with it. It may take multiple minutes to arrive, or be sent to your spam folder.
- Click on the password reset link in the email. This will direct you to a new page. Type in your new password.
- After you set your new password, you will be redirected to the login page to log in to the app with your new password.
Change your Password within the App
In the FastSpring App, you can update your login password. However, if you do not remember your password, reset your password from the login page.
- Log in to the FastSpring App.
- Click the user icon at the top right corner of any page and select Change Password.
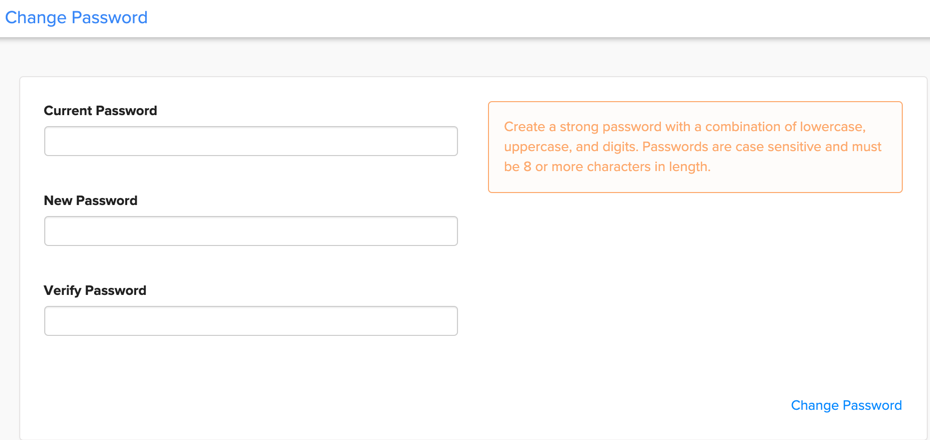
- On the Change Password page:
- Enter your current password in the Current Password field
- Enter your new password in the New Password field
- Enter your new password again in the Verify Password field
- Click Change Password.

SSO Login via Okta and FastSpring
FastSpring sellers have the ability to configure an OIDC Identity Provider for their company’s users. This article details how to configure Okta SSO with the FastSpring Admin App.
Supported Features
Service Provider (SP)-Initiated Authentication (SSO) Flow :
- This authentication flow occurs when the user initiates the authentication flow from the FastSpring app.
- The SP flow can be initiated on the login page at https://login.fastspring.com/identity/auth/login?showSSO=true by selecting "Sign in with SSO"
Identity Provider (IDP)-Initiated Authentication (SSO) Flow - This authentication flow occurs when the user attempts to log in to FastSpring from Okta.
Requirements
In order to configure login with SSO through Okta, you must:
- Be an administrator for your company’s Okta tenant
- Be an administrator for your company’s tenant in the FastSpring App
Configuration Steps
You will need to provide your Okta SSO credentials to FastSpring and this is done in FastSprings Admin App portal under the Security Settings tab.
You will need 2 browser tabs, one for FastSpring, and one for Okta
- Login to FastSpring, https://app.fastspring.com
- Once you have logged in, at the top right under your stores name select Security Settings.

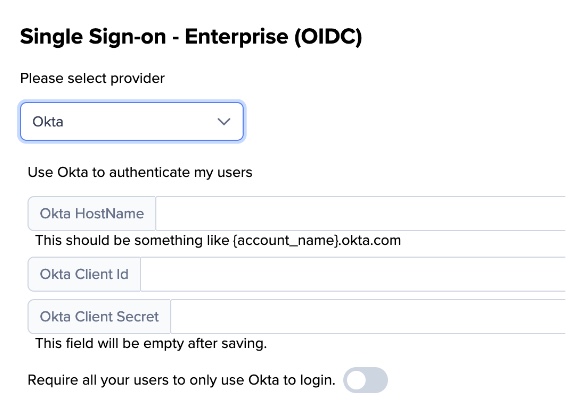
- Under the section Single Sign-On - Enterprise , select Okta as your Single-Sign on Provider, and populate your company’s Okta hostname (usually company.okta.com).

- From the Okta admin panel, navigate to Applications on the left-hand menu and select the Applications sub-menu heading.
- Click on Browse App Catalog and search for ‘FastSpring’. Click into the application and Add Integration.
- In the Sign On tab, copy the Client ID and paste it into the Okta Client ID field on the FastSpring Security Settings page.
- Similarly, copy your Client Secret from the Okta application configuration, and paste it into the Okta Client Secret field in the FastSpring Security Settings page.
- Scroll to the bottom of your Security page in the FastSpring App and hit Save.
- In the FastSpring configuration in Okta, Click Done. With the Settings in the FastSpring application saved, you can navigate to the Assignments tab in the Okta application to provision SSO authentication to the FastSpring app to individuals or groups of users.
As the FastSpring Okta integration does not support SCIM provisioning, anyone assigned the Okta SSO application must already have an account provisioned in your FastSpring tenant or they will be unable to authenticate.
NOTE: If you encounter any issues or have any questions, please do not hesitate to reach out to [email protected]
Updated 3 months ago